
November 26, 2019
Tenable Nessus tips and tricks
Introduction
Here at Astrix, we need to perform vulnerability assessments quite frequently, both on our own systems and on our clients’ systems as part of our Cyber Essentials Plus service and our cybersecurity assessment service.
To help with this, we use Tenable’s Nessus Professional which is marketed as the “#1 for vulnerability assessment” in accuracy, coverage, and adoption and, in our experience, this is true. However, it has a bit of a learning curve so we decided to ease this for others as best as we can by sharing the tips and tricks we’ve accumulated over the years.
Please note that some resolutions we’ve documented in the past but we weren’t able to recreate / test while writing this. If we do manage to confirm these then we’ll update this but, for now, these have been marked with an asterisk (*).
Index
Below is a list of links to each section:
Windows scanning
To get full information from a Windows scan, a good number of things need to go right. However, it’s very common that at the very least one thing will go wrong, it’s sometimes not obvious that a scan hasn’t run fully (which is bad if you’re only looking for oranges and reds), and it can be difficult and/or time-consuming to figure out what went wrong.
Once you see none of the below symptoms / INFOs, your scans should contain full details of the Windows targets.
Please note: The below resolutions should probably only be in place temporarily / for the duration of the scan(s) because, somewhat ironically, they do reduce the security of the devices.
Network discovery
If network discovery isn’t configured correctly, the target device will be online but the scan will only report a small number of network-related INFOs. It’s also probable that you won’t be able to ping and/or browse via SMB to the target.
This is usually due to network discovery and/or file and printer sharing being disabled on the target Window device. These can be enabled by doing one of the following (please note that this should only be done for domain or private network profiles, not guest or public network profiles):
1. Open Explorer → select Network → Network discovery and file sharing are turned off. Network computers and devices are not visible. Click to change… → Turn on network discovery and file sharing → authorise the User Account Control (UAC) prompt.
or
2. Open Control Panel → select Network and Sharing Centre → Change advanced sharing settings → enable Turn on network discovery and Turn on file and printer sharing → select Save changes.
or
3. Open Local Group Policy Editor (gpedit.msc) → browse to Computer Configuration/Windows Settings/Security Settings/Windows Defender Firewall with Advanced Security/Windows Defender Firewall with Advanced Security/Inbound Rules → create allow rules for predefined options File and Printer Sharing and Network Discovery.
Authentication
If there’s anything wrong with the credentials configuration, the scan will report INFO Authentication Failure - Local Checks Not Run (annoyingly, this only appears in the last minute or two of the scan) and the section Output will contain a line that says It was not possible to log into the remote host via smb (invalid credentials).


One cause of this is due to the authentication configuration and/or credentials being incorrect so ensure that:
The field
Usernameonly contains the username (no down-level logon or User Principal Name formats) and that the username is correct.The password is correct.
The field
Domaincontains the hostname or Active Directory domain name.An Azure AD account is not being used. From our extensive testing, we have concluded that, as of Windows 10 v1909 (latest as of writing), it simply doesn’t support the usage of Azure AD accounts / credentials with Network-Level Authentication (NLA) which can be worked around for RDP but not SMB.
Update (2020/03/13): There is another, illusive cause of this that we’re currently working with Tenable support to identify and resolve.
Access permissions
If there is anything wrong with the access configuration, the scan will report INFOs Nessus Windows Scan Not Performed with Admin Privileges and Authentication Success Insufficient Access and both output sections will mention that the file share ADMIN$ was inaccessible.
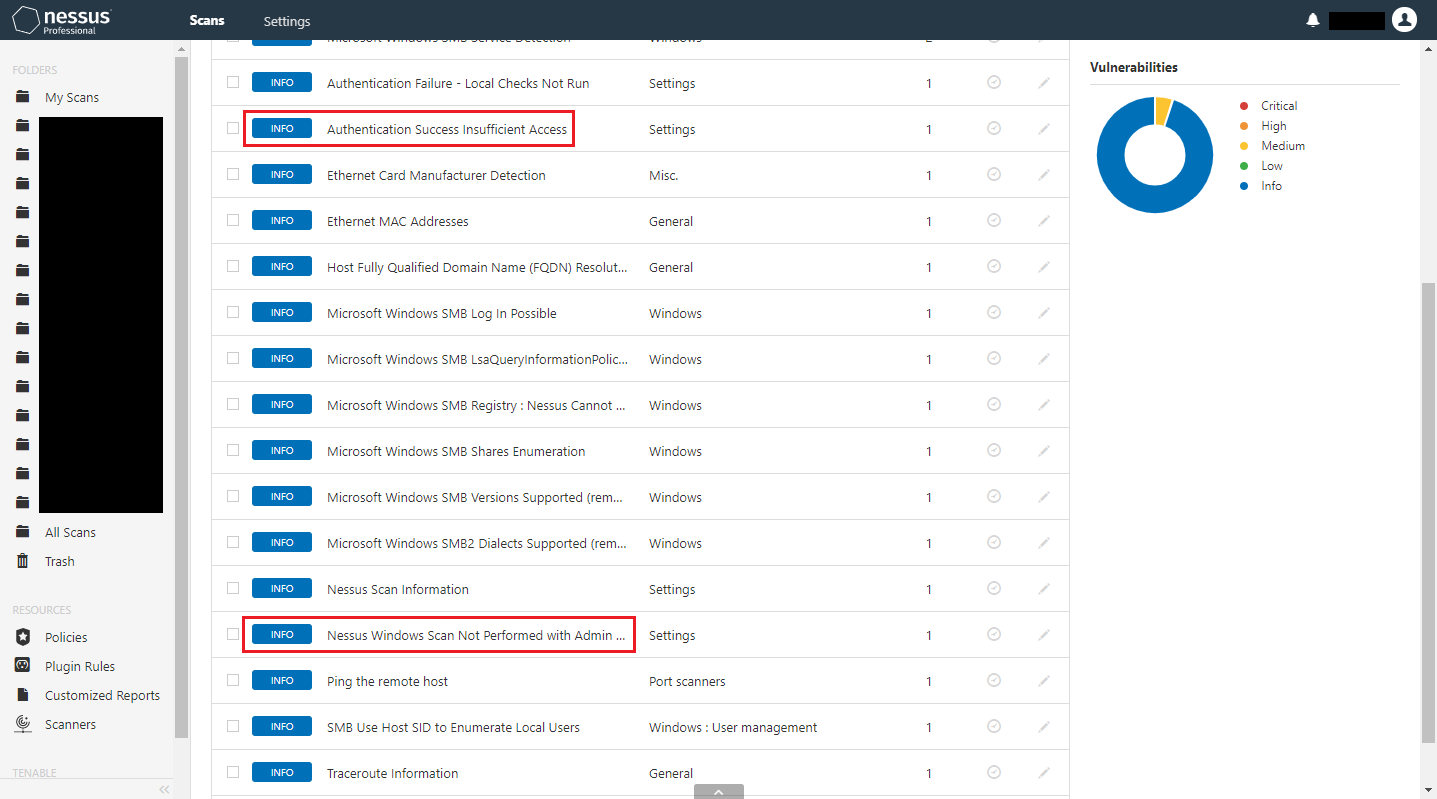


One cause of this is due to the user account not being a member of the local security group Administrators, either directly or indirectly via another security group such as Domain Admins. This can be rectified by doing one of the following:
1. Open Computer Management as administrator → expand Local Users and Groups → select Groups → open Administrators → add the user account.
or
2. Open Group Policy Management → create and edit a Group Policy Object named something like Administrators: PCs or Local Administrators → browse to Computer Configuration\Policies\Windows Settings\Security Settings\Restricted Groups\ → add a group named BUILTIN\Administrators (don’t use the browse function) → add the user account and/or security group to Members of this group.
Another cause of this is that, on Windows 10, the following registry value is missing:
Hive and key path:
HKEY_LOCAL_MACHINE\SOFTWARE\Microsoft\Windows\CurrentVersion\Policies\System\Value type:
DWORD (32-bit) Value/REG_DWORDValue name:
LocalAccountTokenFilterPolicyValue data:
1(decimal) /0x00000001(hexadecimal)
Yet another but rarer cause of this is Authentication Policy Silos which is a security feature in domain functional levels 2012 R2 and later used to restrict certain user accounts to certain computers - for example, domain administrative user accounts to domain controllers, PC administrative user accounts to PCs, etc. As far as we can tell, the only workaround for this is to simply switch the mode from enforce to audit temporarily to allow the scans to run.
Remote registry
If the remote registry is not reachable, the scan will report INFOs:
Microsoft Windows SMB Registry : Nessus Cannot Access the Windows Registry.Authentication Failure - Local Checks Not Run. This time, the sectionOutputwill contain a line that saysCould not connect to \winreg.


This is more common on Windows 10 because the Windows service is disabled by default.
To resolve this, you will need to
1. Ensure that the Windows service Remote Registry (display name) / RemoteRegistry (service name) startup type is at least Manual.


2. Either start the service yourself or configure Nessus to do so for you via the section Credentials → option Start the Remote Registry service during the scan.
Finally
You should now finally see full information for your Windows target devices!


Host(s) detected as dead
In this scenario, the target device will be online but the scan will complete almost instantly and will report:
1. Absolutely nothing. This is because the advanced scan setting Display unreachable hosts was not enabled before the scan was run - the setting does not apply retroactively.
In this case, you can confirm by opening file C:\ProgramData\Tenable\Nessus\nessus\logs\nessusd.messages (this file can be enormous — millions of lines — so it’s a good idea to use a more capable text editor such as Notepad++) and looking at the end of the file for lines that contain The remote host is dead.


or
2. INFO Ping the remote host and the section Output will contain a line that says The remote host […] is considered as dead - not scanning. This is because the advanced scan setting Display unreachable hosts was enabled before the scan was run.


There are a number of potential causes / fixes for this problem:
Ensure that there is network connectivity. The network cable may not be patched in or the VLAN configuration may be blocking the traffic, for example.
Ensure that the targets are correct.
* On the Windows device running Nessus, ensure that network discovery is enabled (refer to section “Windows problems” → “General failure”).
This is more common than you may think because cybersecurity professionals often have the habit of clicking “No” when Windows asks if you want to make your device discoverable and Tenable Nessus tends to be used physically on new networks.
On the Windows device running Nessus, restart the Windows service
Tenable Nessus.On the device running Nessus, ensure that a static IP address from the target isn’t set on a host NIC that isn’t actually connected to the target network. For example, you may be scanning 192.168.1.0/24 from the Wi-Fi NIC but 192.168.1.1/24 could be set statically on the Ethernet NIC which isn’t connected.
* On the Windows device running Nessus, reset networking (elevated commands
netsh winsock resetandnetsh int ip reset), reboot, and re-enable File and Printer Sharing.On the Windows device running Nessus, try using a different NIC (Wi-Fi instead of Ethernet or vice versa, for example).
The scan is utilising a Windows-based VPN which can cause problems with Nessus’ packet forgery. Refer to https://community.tenable.com/s/article/Can-I-scan-my-remote-network-via-a-VPN
The scan is blocked by an Intrusion Prevention System (IPS). In our experience, this seems to be the case with Cisco Meraki MXes.
macOS scanning
As with Windows, a number of things need to go right to get full information from a macOS scan and, to make things worse, there’s very little, if any, information online for how to use Nessus to perform a credentialed scan of a macOS device. (The majority of the information online regarding Nessus and macOS is for how to install Nessus itself or a Nessus Agent, which only links to Nessus Manager.)
Please note: Again, the below resolutions should probably only be in place temporarily / for the duration of the scan(s) because, somewhat ironically, they do reduce the security of the devices.
Remote Login
If Remote Login is not enabled, the scan will only report a small number of network-related INFOs.
To resolve this, open System Preferences → Sharing and enable Remote Login (not for all users).
Authentication setup
When choosing SSH credentials, you’ll see that Nessus defaults to public keys and explicitly labels passwords as “unsafe!”.


So, to use the secure option and generate SSH keys:
1. Sign into the Mac as the user account that will be used by Nessus.
2. Open Terminal and execute the following commands:
mkdir /Users/$USER/.ssh

ssh-keygen -m PEM -t rsa

mv /Users/$USER/.ssh/id_rsa.pub /Users/$USER/.ssh/authorized_keys
3. Open Finder → select Go → Go to folder… → /Users/$USER/.ssh/
4. Copy the file id_rsa (private key) off of the Mac.
![2019-11-22_11-22-16 - macOS_v10.15_Catalina_(Fresh_install)_[Running]_-_.png](https://images.squarespace-cdn.com/content/v1/5b6d93494eddecacd175e239/1574422087013-513VVSU2X7LEQKL4RJJ0/2019-11-22_11-22-16+-+macOS_v10.15_Catalina_%28Fresh_install%29_%5BRunning%5D_-_.png)
![2019-11-18_16-40-59 - macOS_v10.15_Catalina_(Fresh_install)_[Running]_-_.png](https://images.squarespace-cdn.com/content/v1/5b6d93494eddecacd175e239/1574095300241-D0ERUW5JBENMOZZZBSPH/2019-11-18_16-40-59+-+macOS_v10.15_Catalina_%28Fresh_install%29_%5BRunning%5D_-_.png)
![2019-11-22_11-17-38 - macOS_v10.15_Catalina_(Fresh_install)_[Running]_-_.png](https://images.squarespace-cdn.com/content/v1/5b6d93494eddecacd175e239/1574421469468-ZAXH8KH7HJMGIRA9O0LS/2019-11-22_11-17-38+-+macOS_v10.15_Catalina_%28Fresh_install%29_%5BRunning%5D_-_.png)
Now you should be able to configure the scan with the username, private key file, and private key passphrase (password).
Authentication failure
If credentials have not been entered, the scan will report INFOs No Credentials Provided and Local Checks Not Enabled (info).
If credentials have been entered but they’re incorrect or the user account doesn’t have administrative permissions, the scan will report INFOs Authentication Failure - Local Checks Not Run and Authentication Failure(s) for Provided Credentials.
This could be caused by:
The public key authentication being misconfigured. To resolve this, ensure that authentication setup was done correctly.
The user account not being an administrator. To resolve this, open
System Preferences→Users & Groupsand ensure that the tickboxAllow user to administer this computeris checked for the user account being used then reboot the Mac.
Finally
You should now finally see full information for your macOS target devices!
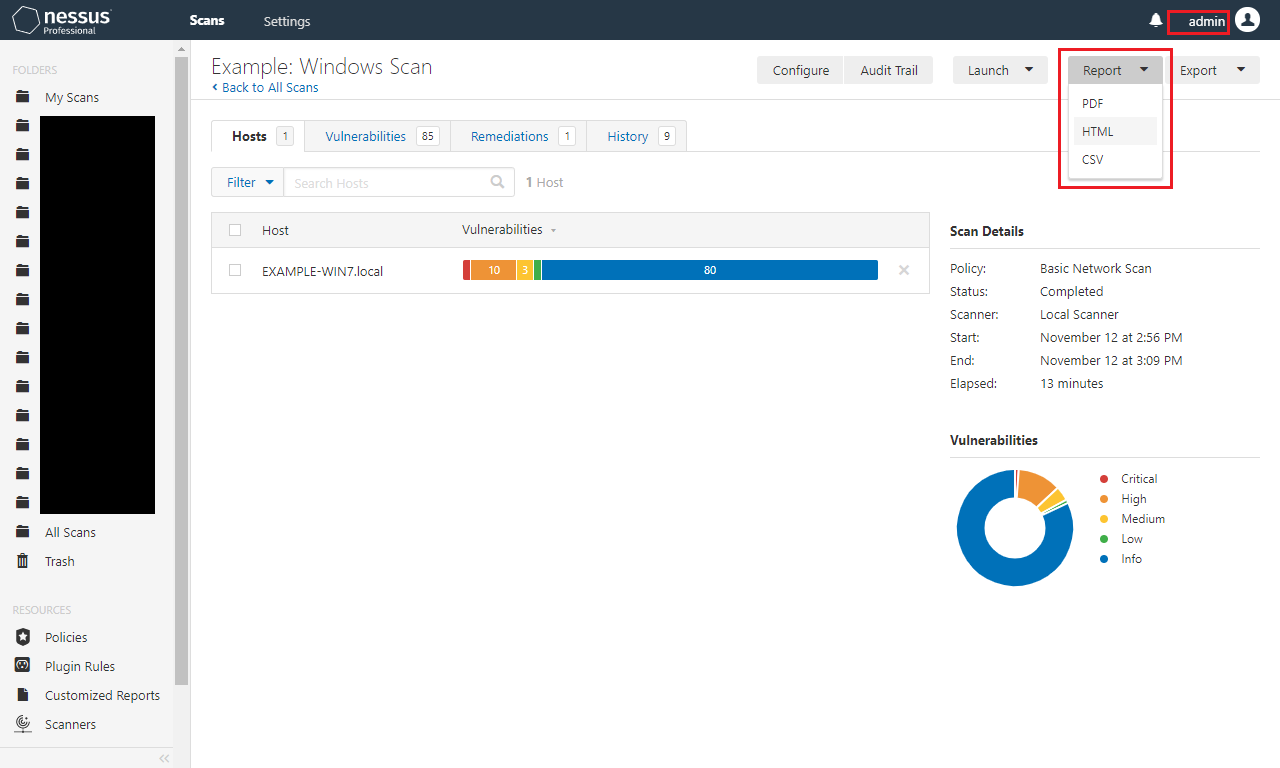
Best report overall
By default, Nessus will generate Executive Summary reports which do exactly what they say on the tin: give a high-level, easy to read overview.
However, ultimately, reports end up in the hands of the IT and/or security team so that they can remediate the vulnerabilities and those people (1) want to resolve as many vulnerabilities in one go as possible and (2) need full detail.
With that in mind, our preferred report is HTML, custom with all details, and grouped by plugin. This way, it is (1) readable pretty much anywhere as almost all devices have a web browser and (2) whilst not as pretty, it contains the full detail needed for fast remediation.


Hiding vulnerabilities
Every now and again, Nessus will report a vulnerability that actually doesn’t exist on the target. In these cases, it’s useful to hide the non-vulnerability from the scan and reports.
For example, we experienced this when Nessus reported that a device was affected by an Intel AMT vulnerability but Intel’s own INTEL-SA-00075 Detection and Mitigation Tool reported that “this system is not vulnerable”.
So, to do this, you select the checkbox to the left of the vulnerability → select the button Modify → change the severity to Hide this result. There are also option to apply this to future scans and with an expiration date.
If required, these modifications can be edited or removed via the section Plugin Rules.
Live results
In version 8 of Nessus, Tenable added a great new feature: Live Results. Basically, this tries to detect potential vulnerabilities in existing scans without having to re-run them, presumably by applying new plugins to existing data. This is very useful if you regularly run scans on the same devices and want to quickly check without having to run full scans (although, you should to be sure).
To enable it, you simply configure a scan and, in the section Settings → Basic → General → Post-Processing, tick the checkbox. This works retroactively too.
If Nessus finds anything relevant then it will add new vulnerabilities with a special marking and a LIVE label.


Automatic backup
By default, Nessus runs a daily backup of all scans and configuration. The files are named global-<yyyy-mm-dd>.db and stored in folder C:\ProgramData\Tenable\Nessus\nessus\backups\.
To restore to one of these previous versions, you simply need to overwrite the file C:\ProgramData\Tenable\Nessus\nessus\global.db with one of the older versions.
(You’ll already know this if your database has corrupted in the past.)
Superseded patches
By default, Nessus vulnerability scans are configured to Show missing patches that have been superseded - older patches that don’t need to be installed because newer patches fix the same things.
Leaving this option enabled can:
Cause real problems to be overlooked by cluttering up the list of vulnerabilities.
Waste a lot of time when the reports are handed over to the patching team who spend time analysing them, checking the affected systems, researching whether patches require any extra work (such as creating registry values), and liaising with the assessor when, in actuality, nothing needed to be done at all.
So, to disable this option, simply configure the scan → select the tab Settings → select the section Report → untick the checkbox Show missing patches that have been superseded.
Additional information
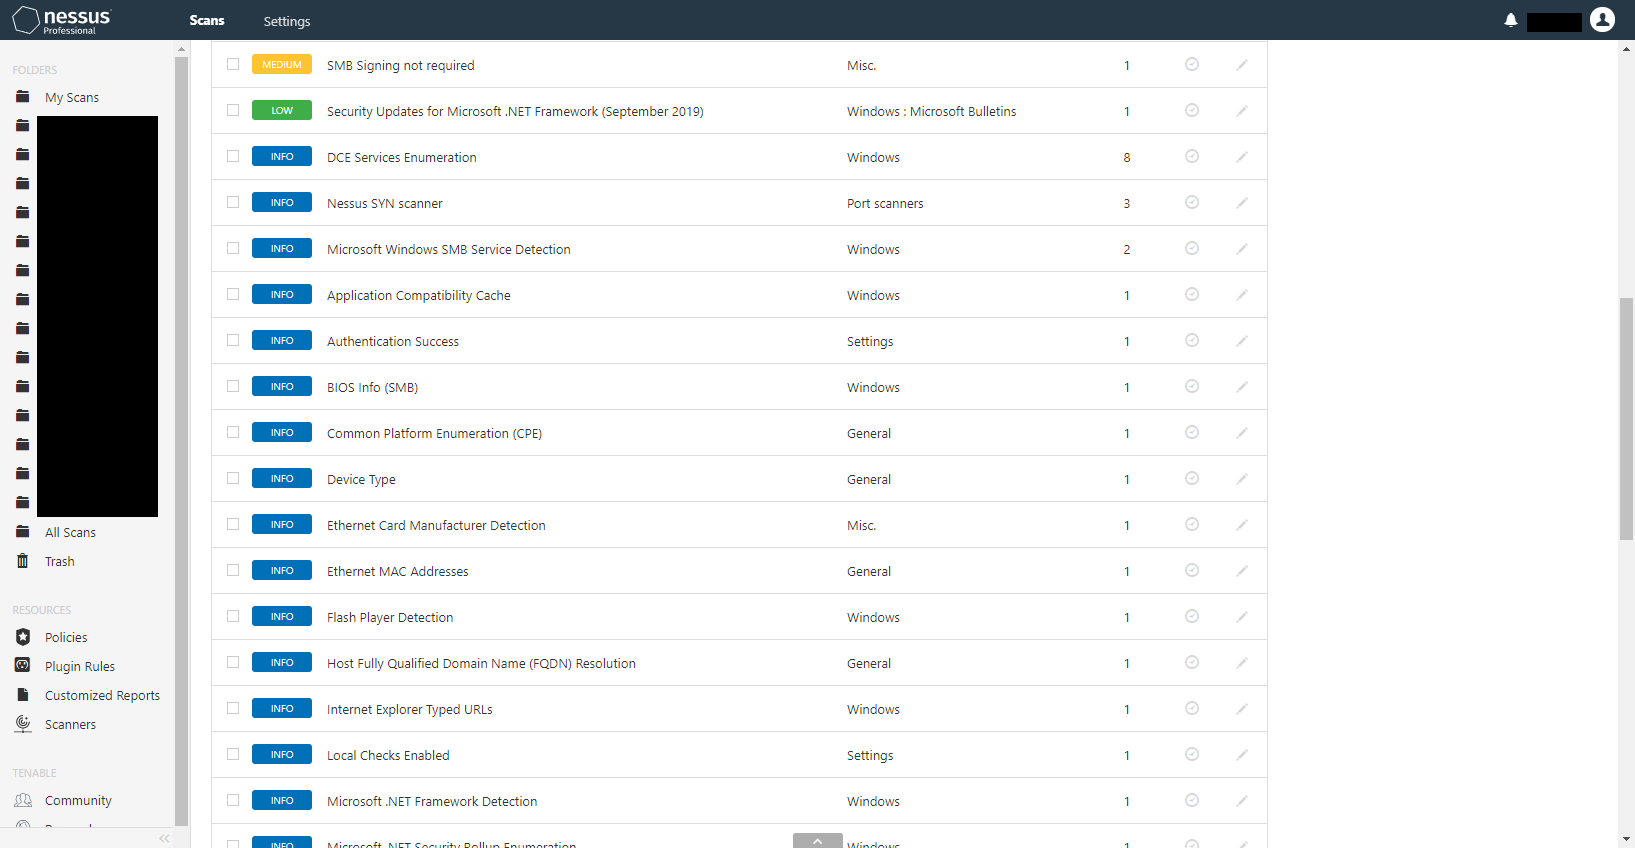
Nessus vulnerability scans actually pull a ton of useful, non-vulnerability-related data and stores it in INFOs. Below are some great examples of these:
Antivirus Software Check.BIOS Info (WMI).
Most notably, this includes information on whether secure boot is enabled on the target(s).Chrome Browser Extension Enumeration.Dropbox Software Detection (uncredentialed check).Enumerate Local Group Memberships.Firewall Rule Enumeration.Flash Cookie History.
This is “a list of URLs that set [Adobe Flash Player] cookies on the remote host”.HSTS Missing From HTTPS Server.Hyper-V Virtual Machine Detection.Inconsistent Hostname and IP Address.Internet Explorer Typed URLs.JavaScript Enabled in Adobe Reader.List Installed Mac OS X Software.LogMeIn Control Panel Installed (Windows)/LogMeIn Detection (Windows).Mac OS X Admin Group User List.Microsoft Internet Explorer Enhanced Security Configuration Detection.Microsoft Office File History.Microsoft Office Macros Configuration.Microsoft Windows - Local Users Information : Passwords Never Expire.Microsoft Windows ARP Table.Microsoft Windows DNS Cache.Microsoft Windows Hosts File.Microsoft Windows Installed Software Enumeration (credentialed check).Microsoft Windows PowerShell Execution Policy.Microsoft Windows SMB : Obtains the Password Policy.Microsoft Windows SMB : WindowsUpdate Disabled
Microsoft Windows SMB Registry : Winlogon Cached Password Weakness.Microsoft Windows SMB Share Hosting Possibly Copyrighted Material.
This is basically a check for media files (MP3, MPG, AVI, etc).Microsoft Windows SMB Share Permissions Enumeration.Microsoft Windows Startup Software Enumeration.Microsoft Windows Summary of Missing Patches.Microsoft Windows USB Device Usage Report.Microsoft Windows Wireless Network History.Netstat Active Connections.Open Port Re-check.Oracle Java Runtime Environment (JRE) Detection.PPTP Detection.PsExec Service Installed.RDP Screenshot.Recent File History.Recycle Bin Files.SMTP Authentication MethodsandSMTP Server Detection.SSL Certificate Expiry - Future Expiry.
This warns of TLS certificates that will expire soon.TeamViewer Version Detection.Terminal Services History. #RDPTraceroute Information.UserAssist Execution History.
This will report lists of programs that have been executed.Windows DNS Server Enumeration.
This will report the NICs’ DNS configurations.Windows Store Application Enumeration.Windows Terminal Services Enabled. #RDPWMI Trusted Platform Module Enumeration. #TPM
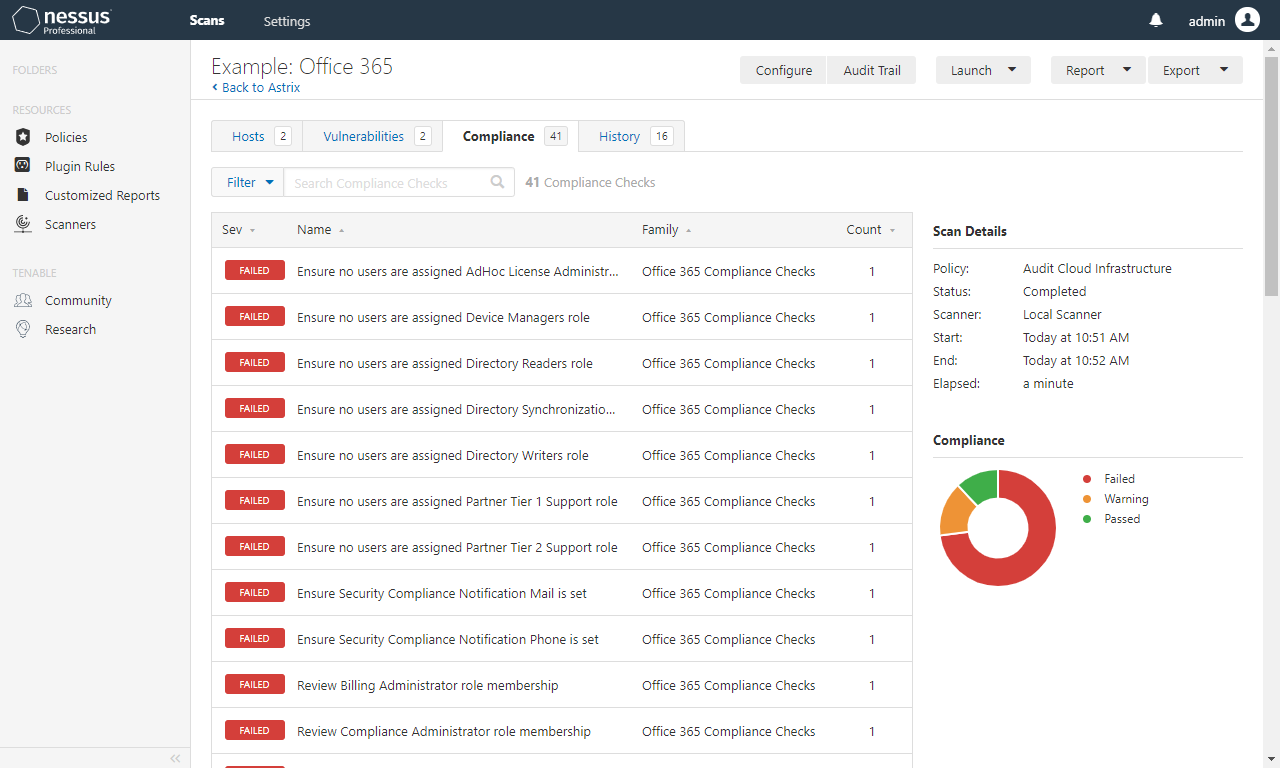
Office 365 scanning
Nessus is capable of scanning Office 365 tenants for compliance against a given known baseline. However, due to a lack of good documentation, setting up the credentials was tricky and resolving the below errors was even trickier.
"{
  \"error\": {
    \"code\": \"Authorization_RequestDenied\",
    \"message\": \"Insufficient privileges to complete the operation.\",
    \"innerError\": {
      \"request-id\": \"7b4216bf-329b-42b7-9b03-bb441697d814\",
      \"date\": \"2019-11-25T10:41:46\"
    }
  }
}"
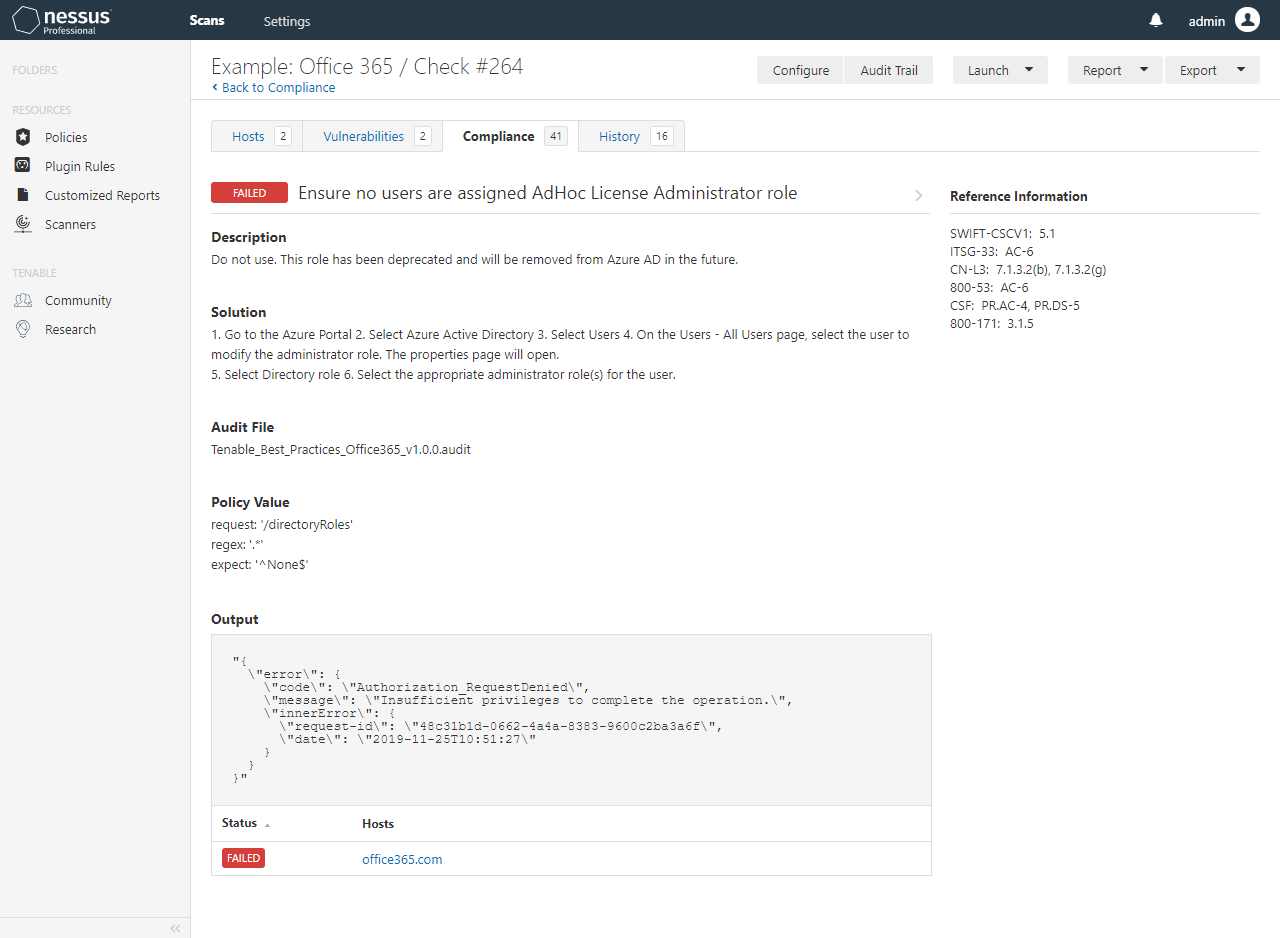
Fortunately, we’ve figured this out and documented it here for everyone.
Step 1 of 7: Create Azure user account
At https://portal.office.com/adminportal/home#/users, create a simple user account for Nessus. No administrative roles are required.
Make a note of the username and password.
Step 2 of 7: Create Azure registered app
At https://portal.azure.com/#blade/Microsoft_AAD_IAM/ActiveDirectoryMenuBlade/RegisteredApps, select New registration → enter a name such as Nessus → select Register.
In Overview, make a note of the Application (client) ID.


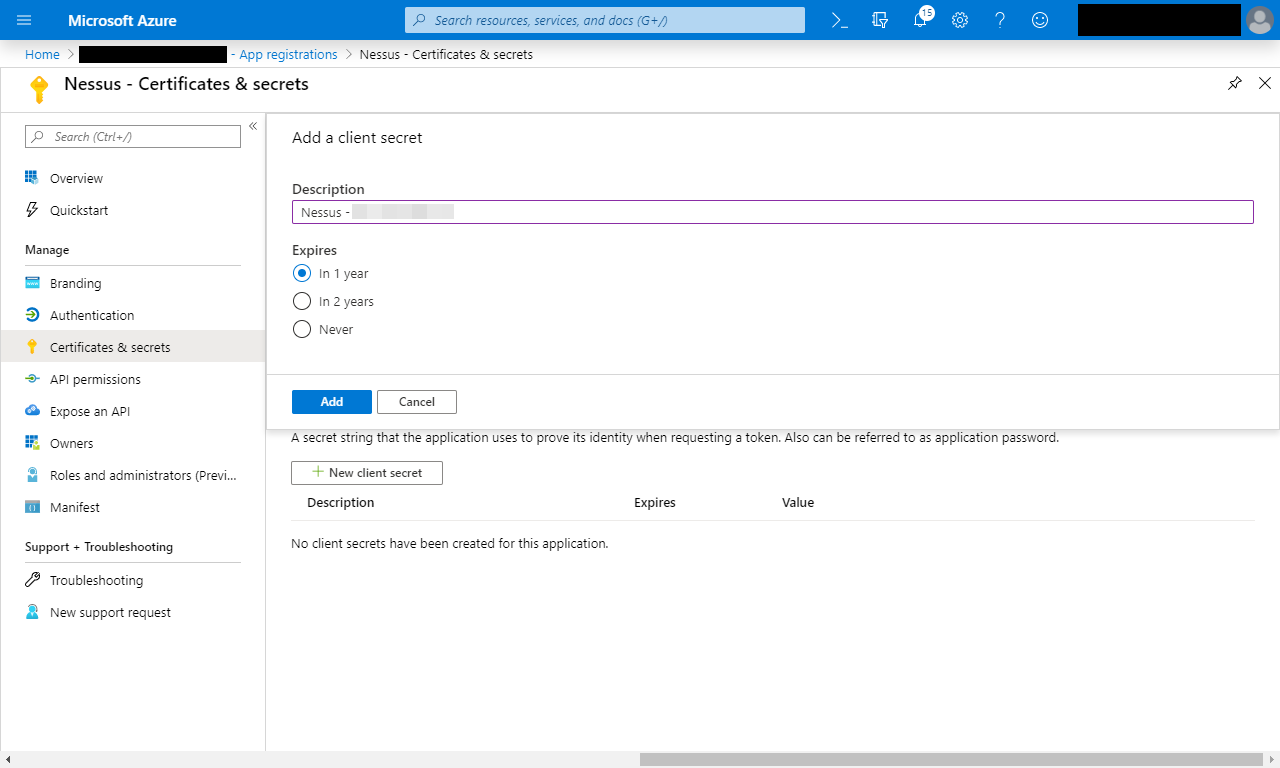
Step 3 of 7: Generate Azure app client secret
In Certificates & secrets, select New client secret → enter a name such as Nessus - <hostname> → select Add.
Make a note of the value.

Step 4 of 7: Grant Azure app admin roles
Using a Microsoft web browser (yes, really), browse to either https://outlook.office365.com/ecp/ → hybrid or https://cmdletpswmodule.blob.core.windows.net/exopsmodule/Microsoft.Online.CSE.PSModule.Client.application then install the Exchange Online PowerShell Module.
Once the Exchange Online PowerShell Module is installed, open it then customise and execute the following commands:
Connect-MsolService;

$displayName = "<Azure registered app name>";

$objectId = (Get-MsolServicePrincipal -SearchString $displayName).ObjectId;

$roleName_companyAdmin = "Company Administrator";

Add-MsolRoleMember -RoleName $roleName_companyAdmin -RoleMemberType ServicePrincipal -RoleMemberObjectId $objectId;

$roleName_userAdmin = "User Account Administrator";

Add-MsolRoleMember -RoleName $roleName_userAdmin -RoleMemberType ServicePrincipal -RoleMemberObjectId $objectId;
Step 5 of 7: Configure scan
Create an Audit Cloud Infrastructure compliance scan and configure it with the Office 365 credentials that you generated in previous steps.


Step 6 of 7: Launch scan
Launch the scan and you should now see the correct output.


Step 7 of 7 (optional): Complete compliance information
If you want to configure the scan with a known, trusted baseline to scan against, re-configure the scan completing the compliance fields Tenable Office 365 Best Practices with the reviewed and approved information from step #6. Please note that there doesn’t seem to be field for every check for some reason.
Sign-off
Feel free to subscribe to our newsletter to be automatically notified of future posts. Until next time! 😊