

In March 2020, systems will stop working if:
They are integrated with Active Directory using non-secure LDAP.
Domain controller servers do have the latest patches installed.
Sysadmins don’t proactively take steps such as the ones we’ve detailed below.
There are numerous existing guides for setting up secure LDAP but none were as thorough, up to date, or user friendly as we’d like for ourselves or our clients so we decided to try to plug the gap by creating this one.
Update 2020/02/12 11:17: According to a couple of Microsoft articles (1, 2), it seems that the decision has been made to push back this default behaviour to “the second half of calendar year 2020”.
Update 2020/03/24 09:41: It seems that Microsoft have decided not to enforce these changes after all. The following is an excerpt from the same Microsoft articles:
“Note that these March 10, 2020 updates and updates in the foreseeable future will not make changes to LDAP signing or LDAP channel binding policies or their registry equivalent on new or existing domain controllers.”
Many systems are integrated via the Lightweight Directory Access Protocol (LDAP) because it allows systems to use a central directory of user and computer details which, in turn, allows systems to be consistent and user-aware and it allows users to access multiple services using the same set of credentials. For example:
Users can use their “PC” username and password with their Virtual Private Network (VPN) connections.
Secure Email Gateway (SEG) accounts can be automatically created.
Multi-Function Printer (MFP) address books can be automatically updated.
Firewalls can allow or reject traffic based on group membership.
etc
The problem with LDAP is that, because people tend to follow the path of least resistance, the most common method is Simple Bind which is not encrypted by default so usernames and passwords are moving around the networks just waiting to be intercepted.
On the 13th of August 2019, Microsoft published security advisory ADV190023 and support article 4520412 stating that, in order to resolve these Man-in-the-Middle (MITM) attacks / vulnerabilities such as CVE-2017-8563, they are planning to release a Windows update in March 2020 to enforce the following:
Simple Bind LDAP over SSL / TLS (LDAPS).
or
Simple Authentication and Security Layer (SASL) LDAP with digital signing requests.
Both of these options require the use of public key authentication via trusted end-entity SSL / TLS certificates.
If steps are not taken then LDAP connections will cease to work as soon as the Windows update is installed.
The first step is to identify what systems are integrated, if any.
Microsoft Advanced Threat Analytics (ATA) can be used for this purpose but if you don’t have that then continue reading this section.
To quickly determine if domain controller servers are being used as LDAP servers, the following PowerShell commands will retrieve the events (ID 2887) that are logged if this is the case.
$DCs = "<DC #1 hostname>", "<DC #2 hostname>";
ForEach ($DC in $DCs) {
    Get-WinEvent -ComputerName $DC -ProviderName Microsoft-Windows-ActiveDirectory_DomainService | Where-Object { $_.Id -Eq 2887 } | Format-List;
}
If events are found and you require more, identifying information such as the client IP address, the username, etc, running the following PowerShell command or manually creating the registry value on each DC will cause the LDAP service to log more useful information in the events (ID 2889):
New-ItemProperty -Path "HKLM:\System\CurrentControlSet\Services\NTDS\Diagnostics" -Name "16 LDAP Interface Events" -PropertyType DWORD -Value 2 -Force
Hive and key path:
HKEY_LOCAL_MACHINE\System\CurrentControlSet\Services\NTDS\Diagnostics
Value type:
DWORD (32-bit) Value/REG_DWORDValue name:
16 LDAP Interface EventsValue data:
2(decimal)
Once that is in place, you can use the following PowerShell commands to extract the identifying information too:
$DCs = "<DC #1 hostname>", "<DC #2 hostname>";
ForEach ($DC in $DCs) {
    Get-WinEvent -ComputerName $DC -ProviderName Microsoft-Windows-ActiveDirectory_DomainService | Where-Object { $_.Id -Eq 2887 -Or $_.Id -Eq 2889 } | Format-List;
}
Alternatively, on each DC, you can open Event Viewer and view the log Applications and Services Logs → Directory Service.
Now that you’ve identified which systems need to be reconfigured, it’s time to resolve the problem.
This section is only relevant if you’re not planning to use Let’s Encrypt or Active Directory Certificate Services (AD CS). If you’re not sure, skip ahead to the section “Certificate” then come back.
The first step is to generate the CSR.
As stated by Microsoft and confirmed by us, in this particular scenario, the Fully-Qualified Domain Name (FQDN) of the DC must be present in one of the following two places in the certificate:
The Common Name (CN) in the Subject field. We will be covering this option.
A DNS entry in the Subject Alternative Name (SAN) extension.
Customise the following content (particularly, the line starting with Subject) then save it as a text-based file named something like ldapcert.inf.
[Version]

Signature="$Windows NT$

[NewRequest]

Subject = "CN=DC01.example.local,O=Astrix Example,OU=IT,ST=RCT,L=Abercynon,C=GB" ; Replace the example between the quotation marks with the Fully-Qualified Domain Name (FQDN) of your domain controller computer account and, optionally, your organisation's information.
KeySpec = 1
KeyLength = 2048 ; This can be 1024, 2048, 4096, 8192, or 16384. Larger key sizes are more secure, but have a greater impact on performance.
Exportable = TRUE
MachineKeySet = TRUE
SMIME = False
PrivateKeyArchive = FALSE
UserProtected = FALSE
UseExistingKeySet = FALSE
ProviderName = "Microsoft RSA SChannel Cryptographic Provider"
ProviderType = 12
RequestType = PKCS10
KeyUsage = 0xa0

[EnhancedKeyUsageExtension]

OID=1.3.6.1.5.5.7.3.1 ; This denotes Server Authentication.
Once you have that file, run the following command:
certreq -new <path to input information file> <path to output CSR file>
For example:
certreq -new "C:\Users\Administrator\Desktop\ldapcert.inf" "C:\Users\Administrator\Desktop\ldapcert.csr"
If you’ve done this correctly, the output file will start with -----BEGIN NEW CERTIFICATE REQUEST----- and end with -----END NEW CERTIFICATE REQUEST-----.
The next step is to submit the CSR to a Certificate Authority (CA) to get an end-entity SSL / TLS certificate issued and installed. If a public CA is used, only a basic, Domain-Validated (DV) one is required.
Because of the DC FQDN requirement, your choice of CA depends entirely on whether your AD DNS domain name uses a valid Internet Top-Level Domain (TLD) or not. A full list of valid Internet TLDs is available on Wikipedia but here’s a quick summary of the common ones to give you an idea:
| Invalid TLD examples | Valid TLD examples |
| .local | .co.uk |
| .internal | .com |
| .corp | .org |
| .lan | .net |
| .localhost | .edu |
We have summarised the various pros and cons of the most common CAs below and linked each heading to the respective section:
| Commercial CA (public) | Let's Encrypt CA (public) | AD CS CA (private) | Self-signed CA (private) | |
| Invalid TLD support? | No | No | Yes | Yes |
| Valid TLD support? | Yes | Yes | Yes | Yes |
| Security overhead | Minimal | Minimal | High | High |
| Validity period | 1+ years | 90 days | Any | Any |
| Validation options | DNS, HTTP, Email | DNS, HTTP1 | Manual (MMC) | None |
| Installation | Manual | Manual, automatic via installed agent2 | Manual, automatic | Manual |
| Free? | No | Yes | Yes | Yes |
| Revocable? | Yes | Yes | Yes | No |
| Expiry notification? | Yes | Yes | Yes | No |
| Public trust? | Yes | Yes | No | No |
1. Installing as few applications as possible.
2. Not forwarding traffic to it from the Internet. This may be acceptable if Let’s Encrypt published a list of public IP addresses that they use for the DV process so that the firewall rule can be restricted but they confirmed in their FAQs that they do not.
In any case, the submission and issuance process is quite different depending on which CA you chose so we will cover each of these below.
For demonstration purposes, we will be using a Comodo PositiveSSL Certificate via CheapSSLSecurity with domain validation via DNS.
First, submit the CSR text to your chosen commercial CA and choose a domain validation option.
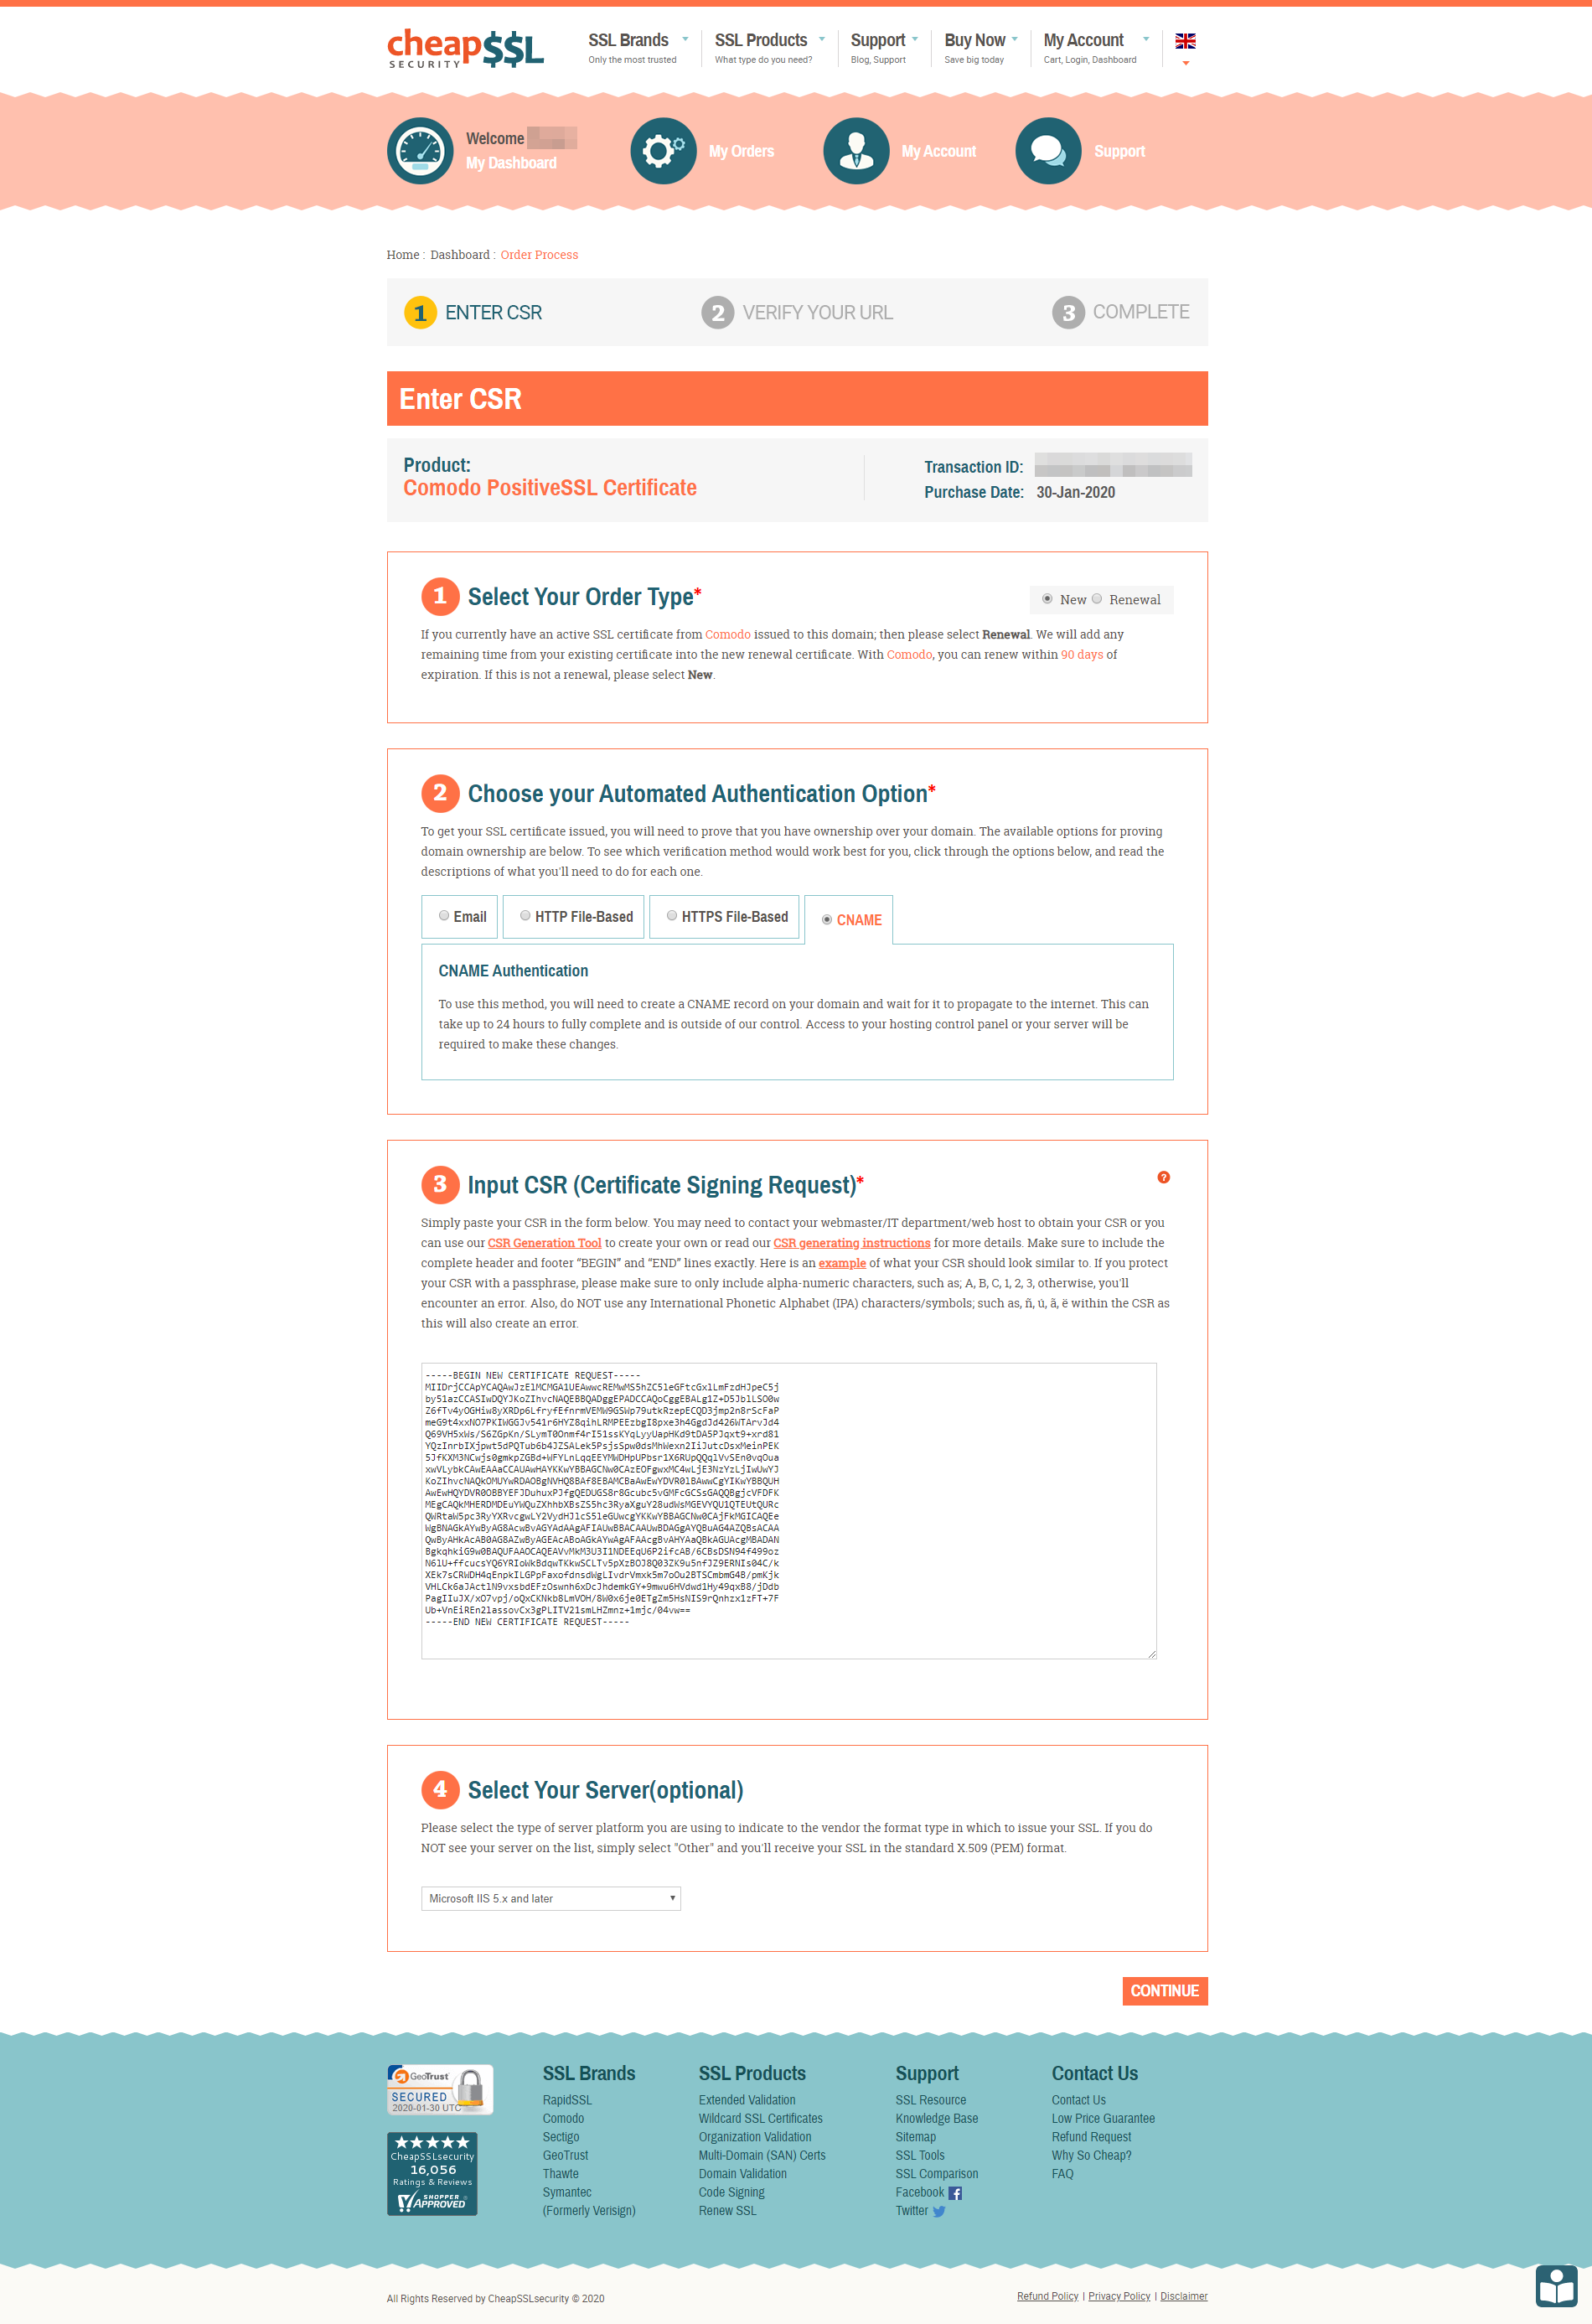

Second, complete the CA’s domain validation process, wait for the certificate to be issued, and download the certificate package.


Third, if required, install any intermediate or root CA certificates to the Local Machine’s store Intermediate Certification Authorities or Trusted Root Certification Authorities. This can be done by opening the missing CA certificate’s properties and selecting Install Certificate…, as demonstrated below.
Installing the certificate for the intermediate CA “Sectigo RSA Domain Validation Secure Server CA” to complete the chain of trust for the end-entity certificate.
Fourth, run the following command to install the certificate:
certreq -accept <path to CRT file>


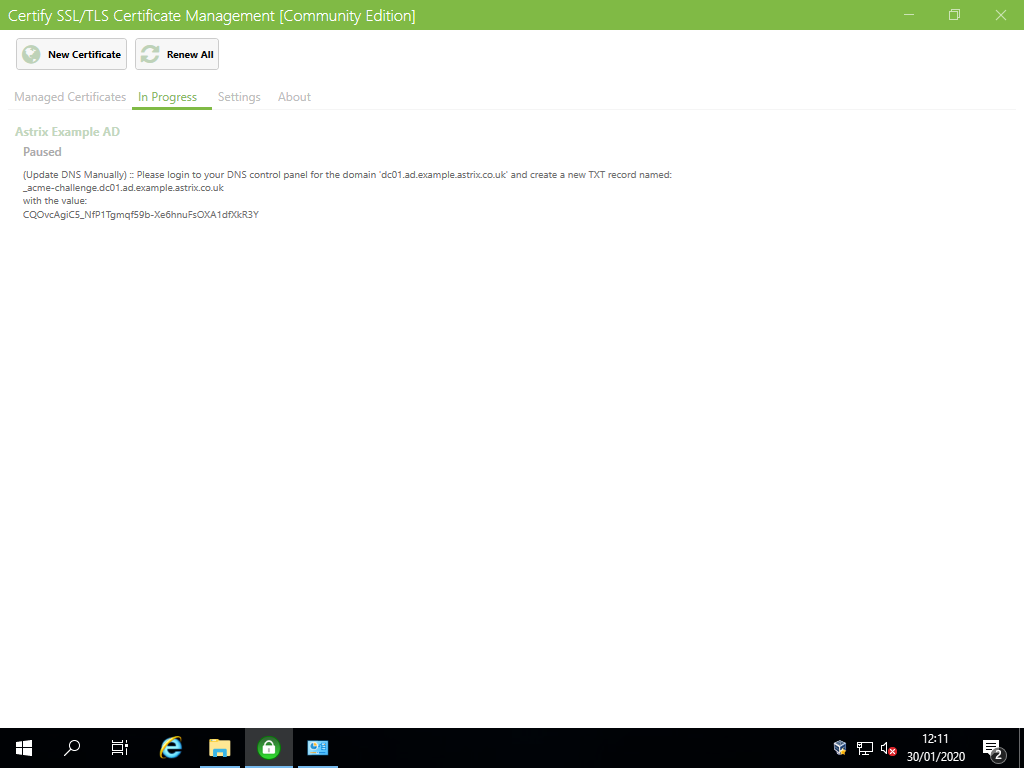
First, install an ACME Client. For demonstration purposes, we will be using Certify SSL Manager and authorization / domain validation via DNS.
Second, open Certify SSL Manager and:
As prompted, register a contact email address. This will be used to notify you of upcoming certificate expiries / renewals, etc.
Add a new certificate and:
In the section
Certificate Domains, add the FQDN of the DC. For example,DC01.ad.example.astrix.co.uk.In the section
Authorization, set the following:Challenge type:
dns-01DNS Update Method:
(Update DNS Manually)
Save the changes.
Select the button
Request a certificate.As prompted, create the DNS TXT Resource Record (RR) in the domain’s authoritative name servers.
Select the button
Request a certificateagain to continue.
The certificate should now be issued and installed.


First, install Active Directory Certificate Services (AD CS) by doing the following:
Open Server Manager.
Select
Dashboard→Add roles and features.In the section
Before You Begin, simply select the buttonNext >.In the section
Installation Type, keep the radio buttonRole-based or feature-based installationenabled and select the buttonNext >.In the section
Server Selection, choose the server that you wish to be the root CA and select the buttonNext >.In the section
Server Roles, tickActive Directory Certificate Services, select the buttonAdd Features, and select the buttonNext >.In the section
Features, simply select the buttonNext >.In the section
AD CS, ensure that you’re happy with the server’s hostname because it cannot be changed then select the buttonNext >.In the section
Role Services, simply select the buttonNext >.In the section
Confirmation, simply select the buttonInstall.


Second, configure AD CS by doing the following:
Open Server Manager.
Select the flag and warning symbol then the link
Configure Active Directory Certificate Services on the destination server.In the section
Credentials, assuming you’re signed in as an administrator, simply select the buttonNext >.In the section
Role Services, check the tickboxCertification Authoritythen select the buttonNext >.In the section
Setup Type, choose your preferred CA type then select the buttonNext >.In the section
CA Type, select the radio buttonRoot CAthen select the buttonNext >.In the section
Private Key, select the radio buttonCreate a new private keythen select the buttonNext >.In the section
Cryptography, select the following then select the buttonNext >:Cryptographic provider:
RSA#Microsoft Software Key Storage ProviderKey length:
2048(at least) or4096(recommended)Hash algorithm:
SHA256(at least)
In the section
CA Name, change the defaults to the following then select the buttonNext >:Common name for this CA: This must be the same as the server’s FQDN.
DC01.example.local, for example.Distinguished name suffix: Blank.
Preview of distinguished name: This should automatically be
CN=<server’s FQDN>.
In the section
Validity Period, simply select the buttonNext >.In the section
Certificate Database, simply select the buttonNext >.In the section
Confirmation, simply select the buttonConfigure.In the section
Results, simply select the buttonClose.


Third, run the following command and make a note of the value after Unique container name for the new certificate.
certutil -verifystore MY
Fourth, open Explorer and do the following:
Browse to
C:\ProgramData\Microsoft\Crypto\Keys\.View the properties of the file named
<unique container name>.Select the tab
Securitythen select the buttonEdit….Select the button
Add…, enterNetwork Service, select the buttonCheck Names, then select the buttonOK.
This should add the security principalNETWORK SERVICEwith allow permissionsRead & executeandRead.Close all windows applying changes.
In cases such as this (“inter-component authentication”, as McAfee describes it here), using a self-signed certificate is better than nothing but whether it can be considered as “secure” or “safe” is a debate for another time…
First, install OpenSSL.
Second, create a text-based file named something like v3ext.txt with the following content:
keyUsage=digitalSignature,keyEncipherment
extendedKeyUsage=serverAuth
subjectKeyIdentifier=hash
Third, run the following PowerShell commands. Only the OpenSSL path needs to be customised. When prompted, ensure that you use a strong passphrase for the CA’s private keyfile.
& "<path>\openssl.exe" genrsa -aes256 -out ca_private.key 4096;
& "<path>\openssl.exe" req -new -x509 -days 3650 -key ca_private.key -out ca_public.crt;
Import-Certificate -FilePath ca_public.crt -CertStoreLocation Cert:\LocalMachine\Root;
& "<path>\openssl.exe" x509 -req -days 365 -in ldapcert.csr -CA ca_public.crt -CAkey ca_private.key -extfile v3ext.txt -set_serial 01 -out ldapcert.crt;
& "<path>\openssl.exe" x509 -in ldapcert.crt -text;
certreq -accept ldapcert.crt
![2020-01-30 08-58-12 - Windows_Server_2019_(Fresh_set_up)_[Running]_-_Ora.png](https://images.squarespace-cdn.com/content/v1/5b6d93494eddecacd175e239/1580374742083-UTICKQW7DD1Y0FB99SUF/2020-01-30+08-58-12+-+Windows_Server_2019_%28Fresh_set_up%29_%5BRunning%5D_-_Ora.png)
![2020-01-30 08-58-41 - Windows_Server_2019_(Fresh_set_up)_[Running]_-_Ora.png](https://images.squarespace-cdn.com/content/v1/5b6d93494eddecacd175e239/1580374744051-18UE0MIHZIA5RF4WPF9A/2020-01-30+08-58-41+-+Windows_Server_2019_%28Fresh_set_up%29_%5BRunning%5D_-_Ora.png)
![2020-01-30 09-19-52 - Windows_Server_2019_(Fresh_set_up)_[Running]_-_Ora.png](https://images.squarespace-cdn.com/content/v1/5b6d93494eddecacd175e239/1580376105612-JN3NMTYQHDKXV08VINR5/2020-01-30+09-19-52+-+Windows_Server_2019_%28Fresh_set_up%29_%5BRunning%5D_-_Ora.png)
![2020-01-30 09-21-20 - Windows_Server_2019_(Fresh_set_up)_[Running]_-_Ora.png](https://images.squarespace-cdn.com/content/v1/5b6d93494eddecacd175e239/1580376108152-40Z6YEJ3RBW9XEKOL2MS/2020-01-30+09-21-20+-+Windows_Server_2019_%28Fresh_set_up%29_%5BRunning%5D_-_Ora.png)
Once the certificate has been installed, the DC server’s bindings need to be updated.
This can be done by simply rebooting the DC server or, alternatively, by doing the following two steps.
First, create a text-based file named something like ldap-renewservercert.txt with the following content:
dn:
changetype: modify
add: renewServerCertificate
renewServerCertificate: 1
-
Second, run the following command:
ldifde -i -f ldap-renewservercert.txt
That’s it!
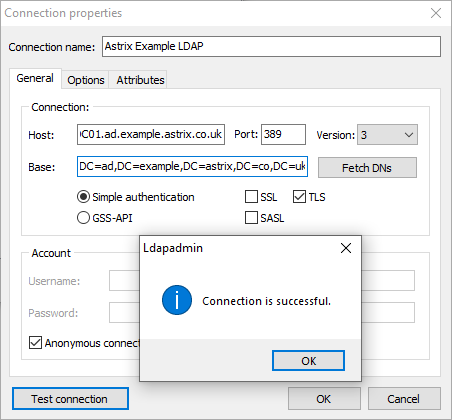
Once everything has been set up, it’s a good idea to test that it’s all actually working as required.
To do this, you can use tools such as ldp.exe (available on DC servers and as part of the AD DS management tools) or LDAP Admin. We will be using the latter on a PC so as to test external connections.
If the following configurations connect successfully then you should be good to go:
Host: FQDN of DC server. For example,
DC01.ad.example.astrix.co.uk. This is so that there are no name mismatches when validating the certificate.Security:
Simple authenticationwith:SSL( / TLS) on port636TLSon port389or
SASLon port389


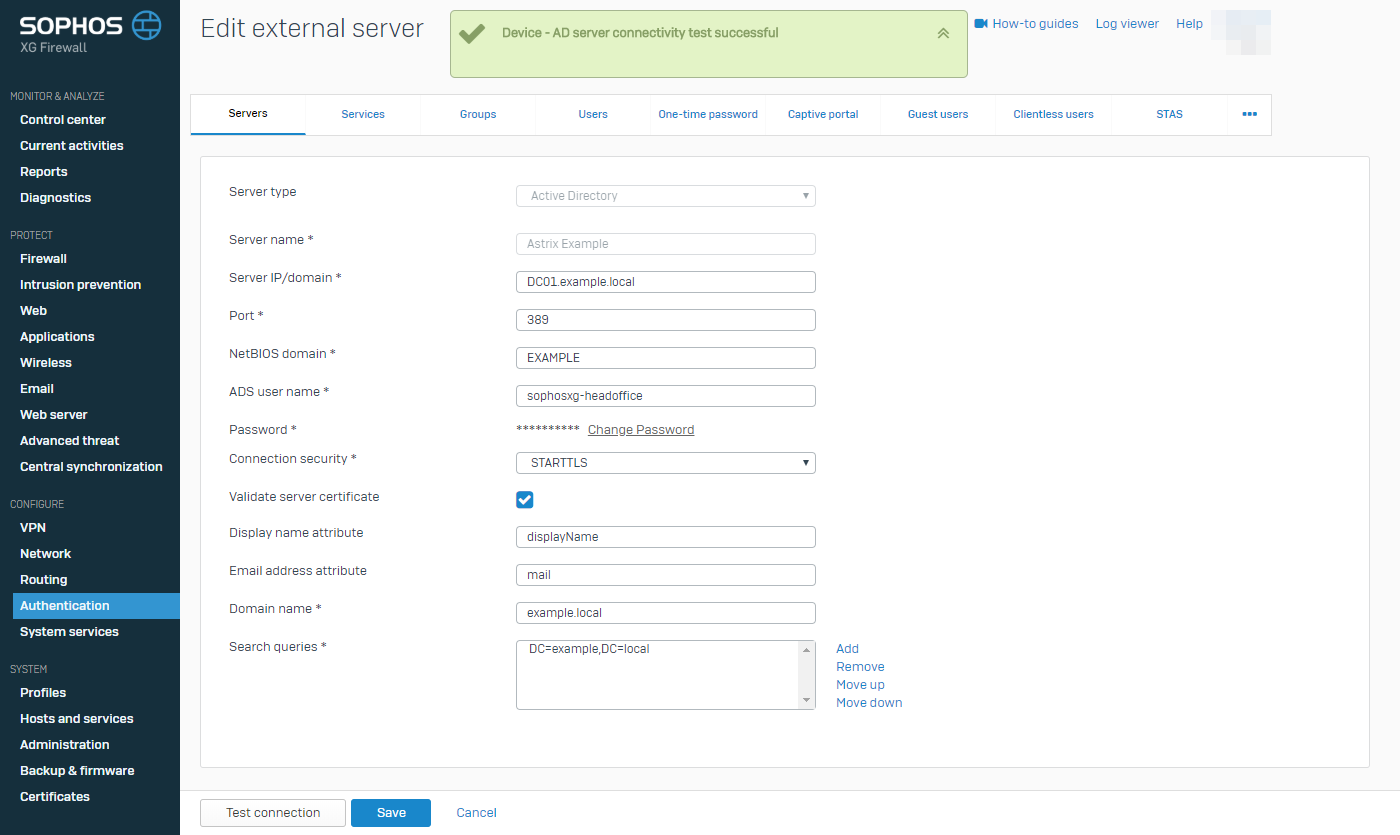
The final step is to actually reconfigure the clients to use one of the following connection methods:
Simple Bind LDAP using SSL / TLS (usually on port 636) or StartTLS (usually on port 389).
or
Simple Authentication and Security Layer (SASL) LDAP with digital signing requests.
Using a Sophos XG UTM / NGFW and an AD CS-issued certificate as an example, we can see that, by default, it can connect to the LDAP / DC server with SSL / TLS or StartTLS encryption enabled but not when certificate validation is enabled because it doesn’t trust the CA.


So, to install the CA certificate, do the following:
On the AD CS CA server:
Open
certmgr.msc.Expand the folder
Trusted Root Certification Authorities→ select the folderCertificates.Right-click on your CA certificate (it will be issued to and by the server’s FQDN) → hover over
All Tasks→ selectExport….Select the button
Next→ ensure that the radio buttonDER encoded binary X.509 (.CER)is selected → select the buttonNext→ enter a path and file name to save the certificate as → select the buttonNext→ select the buttonFinish.
On the Sophos XG:
In the group
SYSTEM, select the tabCertificates→ select the tabCertificate authorities→ select the buttonAdd.Enter the following information:
Name: A descriptive name that will be displayed in the list. The subject (including the FQDN) will be automatically listed alongside it.
Astrix Example AD CS Root CAfor example.Certificate file format:
DERCertificate: The
CERfile exported as part of 1.4.
Select the button
Save.

![2020-01-31 11-20-39 - Windows_Server_2019_(.local,_AD_CS)_[Running]_-_Or.png](https://images.squarespace-cdn.com/content/v1/5b6d93494eddecacd175e239/1580470307486-N1FVMJFKTHNX10TAOQRZ/2020-01-31+11-20-39+-+Windows_Server_2019_%28.local%2C_AD_CS%29_%5BRunning%5D_-_Or.png)
![2020-01-31 11-21-35 - Windows_Server_2019_(.local,_AD_CS)_[Running]_-_Or.png](https://images.squarespace-cdn.com/content/v1/5b6d93494eddecacd175e239/1580470308311-5FQFG7NRPVUSA65KG7VJ/2020-01-31+11-21-35+-+Windows_Server_2019_%28.local%2C_AD_CS%29_%5BRunning%5D_-_Or.png)
![2020-01-31 11-22-24 - Windows_Server_2019_(.local,_AD_CS)_[Running]_-_Or.png](https://images.squarespace-cdn.com/content/v1/5b6d93494eddecacd175e239/1580470308414-W6TK6VLNJFAFQ3SJUWNH/2020-01-31+11-22-24+-+Windows_Server_2019_%28.local%2C_AD_CS%29_%5BRunning%5D_-_Or.png)
![2020-01-31 11-36-12 - Windows_Server_2019_(.local,_AD_CS)_[Running]_-_Or.png](https://images.squarespace-cdn.com/content/v1/5b6d93494eddecacd175e239/1580470604868-6NAEEUZB5YBZENQBXIM6/2020-01-31+11-36-12+-+Windows_Server_2019_%28.local%2C_AD_CS%29_%5BRunning%5D_-_Or.png)


Now that the chain of trust is complete, the device can validate the LDAPS certificate.

We do not recommend working around this problem but if you legitimately have a reason that you cannot use one of the above options then you can do so in one of two ways.
LDAP server Channel Binding can be disabled by running the following command or manually creating the following registry value:
New-ItemProperty -Path "HKLM:\System\CurrentControlSet\Services\NTDS\Parameters" -Name "LdapEnforceChannelBinding" -PropertyType DWORD -Value 0 -Force
Hive and key path:
HKEY_LOCAL_MACHINE\System\CurrentControlSet\Services\NTDS\Parameters
Value type:
DWORD (32-bit) Value/REG_DWORDValue name:
LdapEnforceChannelBindingValue data:
0(decimal). This indicates "disabled” – No channel binding validation is performed. This is the behavior of all servers that have not been updated.
LDAP server signing can be disabled by setting the following policy:
Location:
Computer Configuration→Policies→Windows Settings→Security Settings→Local Policies→Security OptionsPolicy name:
Domain controller: LDAP server signing requirementsPolicy setting:
None


We sincerely hope that this has been useful.
Feel free to subscribe to our newsletter to be automatically notified of future posts.
Until next time! 😊